

Classic Homemade Croissants
These Classic Homemade Croissants are buttery, flaky, and just plain irresistible! Did you know you can make them at home?
If you’ve ever wondered How to Make Homemade Croissants, a lot of patience is involved. There’s nothing fancy about the ingredients but the process involves rolling, folding, chilling, and repeating. These croissants from scratch are definitely worth the effort. They taste like they came fresh out of a Parisian pâtisserie.

Why You Must Make
- These croissants are made with real butter and yeast. You can taste the difference from what you buy in your local markets!
- If you love to bake, you must make croissants from scratch at least once.
- Homemade croissants could be the best thing you ever make in your kitchen!
It’s rare to eat a croissant these days that’s not from Costco or the bakery in your favorite supermarket. But are they even made with real butter? If you can’t taste the butter, they’re probably not anything like my classic homemade croissants. Butter? Check. Yeast? Check. Lots of steps and time to complete? Check. But worth it!
I found some new muscles today. I do actually work out and can even do push-ups, but rolling out this croissant dough was certainly an invigorating bicep, tricep (and who knows what other muscles!) training. This was my second round at making croissants as I made them once before, for the Daring Bakers.
So when my oldest was by for Sunday night dinner, he was disappointed when I started reeling off what was left on the instructions list: 2 more hours in the fridge, then a turning, another two hours in the fridge, then rolling and shaping and another 3-4 hour proofing before baking. Patience is a virtue, remember?
Expert Tips
I “could” have had these completed on Sunday, but a little hiccup caused a delay. You see, this French croissant recipe calls for fresh yeast. Upon googling it, I found it wasn’t easy to locate and impossible to find at the typical supermarket, and there were tales of ordering it online and ending up with dead yeast. With a pound of butter and 1+ days of work invested into these puppies, I wasn’t going to risk it.
- If you don’t have access to fresh yeast (and I’m guessing that’s most of my readers), substitute 4 ½ teaspoons of Dry Active Yeast (affiliate link) for the one ounce of fresh.
- Learn from my mistake: I followed the instructions for the fresh yeast, tossing it in with the other ingredients and mixing, then kneading in the stand mixer. Well, my first dough was the consistency of Silly Putty, nothing like the “soft butter” spoken of by the recipe developer, Esther McManus. Then I had an aha moment at about 4 AM on Sunday. I needed to proof the dry active yeast. Duh. I started over at that point. Who needs sleep?
- PRO-Tip: If you use, dry active yeast, stir it into lukewarm milk before mixing it in with the other ingredients.
- You will use a lot of cold butter. It’s beaten first, to soften, then rolled flat on a floured surface so that it can be wrapped in dough.
- Next comes the fun part, the rolling and folding. All details are in the recipe.
- PRO-Tip: I like to keep track of my folds by marking “fold #1,” etc. on my parchment.
- For the best results use a higher-fat European butter. American butter often has water added.
- If you notice the butter has become too soft and is oozing out when you do the initial pounding, pop it all in the fridge for 1-2 hours before you do your first round of rolling and folding.
- Note that you will Brush (affiliate link to silicone pastry brush) the croissants with an egg wash twice, so refrigerate the egg mixture after the first coat for the second coat.
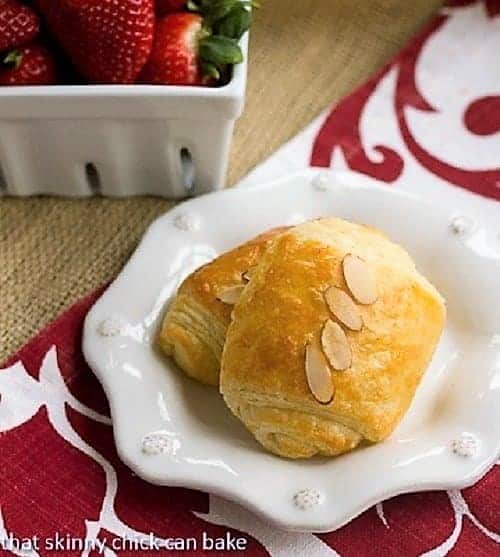
- There is an option to make almond croissants in the recipe. Just buy a container of almond paste if you want to give those a try. They’re an exquisite alternative.

What to Make with Croissant Dough
Well, the aroma in the house was that buttery fragrance found in a French Patisserie as these gems baked away. Fill some with almond paste and/or roll the dough around some chocolate morsels in others.
If you’d like to try these tender, flaky pastries, I’d recommend watching this video where Julia Child watches Esther whip up and shape this dough. And set aside a whole weekend dedicated to the most delicious baked goods you’ll ever make!
Frequently Asked Questions
Laminated dough is a multilayered dough where each thin layer is separated by butter. It is created by repeatedly folding and rolling. Croissants are made with laminated dough and can have more than eighty layers.
A few tips to make the best croissants include using good European butter, monitoring the temperature of the butter so it rolls nicely but doesn’t ooze out, and using pastry flour if you want tender croissants.
There are 3 types of flour you can use to make croissants. Pastry or Cake Flour makes the most tender croissants and All-Purpose Flour or Bread Flour will make less delicate, chewier croissants.
Croissant Dough and Puff Pastry Dough are both laminated, but they are not the same. Croissant dough uses yeast which gives croissants a light, soft texture. Plus croissant dough also contains sugar and milk which are not in puff pastry.
You May Also Like:
- Best Cinnamon Rolls are a family favorite
- Braided Easter Bread doesn’t have to be only for holidays!
- Homemade Pizza Crust and add your favorite toppings.
- Plus, check out more of my Best Bread Recipes.
Homemade Croissants
The ultimate croissant recipe! Buttery, flaky and out of this world!
Ingredients
- 4 ½ teaspoons active dry yeast
- 1+ cup milk, warm it slightly to proof the yeast, about 110°
- 3¾ cups unbleached all-purpose flour
- ⅓ cup sugar
- 2 teaspoons salt
For the butter square:
- 1 pound 2 ounces butter, unsalted, cold, and cut into ½-inch cubes (4 ½ sticks)
- 2 tablespoons unbleached all-purpose flour
For the egg wash:
- 1 large egg beaten with 1 tablespoon of cold water
Instructions
For the dough:
- Add the yeast to the milk and let the yeast soften and bloom.
- Put the yeast, flour sugar, salt, and 1 cup of milk into the bowl of a mixer fitted with a dough hook.
- With the machine on its lowest speed, mix for 1 to 2 minutes, until a soft, moist dough forms on the hook. If the dough is too dry, add more milk, 1 tablespoon at a time (I added almost 6 T). You want all the flour to be moistened. The hook should pick up all the flour from the bowl.
- Set the mixer to the highest speed your manufacturer allows for dough (2 on my KitchenAid) and work the dough until it is smooth and elastic, no longer sticky, and close to the consistency of soft butter.
- Remove the dough from the mixer and put it in a plastic bag, leaving a bit of space for the dough to expand. Keep the dough at room temperature for a half-hour, then refrigerate the dough for 8 hours or overnight.
For the butter:
- Attach the paddle to your mixer and beat the butter and flour on the highest speed until smooth and the same consistency as the croissant dough, about 2 minutes.
- Put the beaten butter onto a large piece of plastic wrap, give it a few slaps to remove any air, then shape into an oval 5 to 6 inches long and 1 inch thick.
- Wrap it tightly and refrigerate it until needed.
Incorporating the butter:
- Put the croissant dough on a floured large work surface and dust the top of the dough lightly with flour. Using a long rolling pin, roll the dough into an oval approximately 10 inches wide and 17 inches long.
- Center the oval of chilled butter across the oval of dough and fold the top and bottom of the dough over the butter to make a package. Gently stretch the folded layers of dough out to the sides and press the edges firmly to seal.
- Using a rolling pin, start whacking the dough to distribute the butter.
- Rotate the dough and pound it again in the other direction....you should see the butter moving towards the edges.
- After pounding you should have a 1-inch thick rectangle about 14 inches long and 6 inches wide.
- Keeping the work surface and the top of the dough well floured, roll the dough into a rectangle 24 to 26 inches long and about 14 inches wide, with the long side facing you. (If your dough and butter have become warm, you may want to refrigerate for an hour or two before this first rolling stage).
- Brush off the excess flour and, working from the left and right sides, fold the dough inward into thirds (like a brochure), so that you have a package that's about 8 inches wide by 14 inches long.
- Move the dough to a parchment-lined baking sheet, cover, and refrigerate for at least 2 hours. You may want to mark the parchment "Turn 1" to keep track of your turns.
Second turn:
- Place the dough so that the 14-inch side runs left to right.
- Making sure the work surface is well floured at all times, roll the dough as you did before into a rectangle 24 to 26 inches long by about 14 inches wide. Note that it's OK if the dough cracks a little with the next couple of turns.
- As before, fold the dough in thirds. Place it on the parchment, mark the paper “turn 2”, cover, and refrigerate for at least 2 hours.
Third turn:
- Start again with a 14-inch side running from your left side to your right. Roll the dough into a rectangle 24 by 14 inches wide.
- Fold the left and right sides of the dough into the center, leaving a little space in the center, and then fold one side over the other as though you were closing a book.
Chilling the dough:
- Brush off the flour, wrap the dough in plastic, and refrigerate for 2 hours (I refrigerated overnight).
Rolling the dough:
- Flour a work surface. Place the dough so that it resembles a book, with the spine to your left and the opening to your right.
- Then cut the dough in half horizontally...for easier handling. so that you have two pieces about 7 inches long and about 6 ½ inches wide.
- Wrap and chill one half while you roll and cut the other. Extra dough may also be frozen to use at another time if desired.
- Flour the dough and roll it into a rectangle that's 24 to 26 inches long and 15 to 18 inches wide. Keep the work surface and the dough well-floured. This will give your muscles a workout!
- If necessary turn the dough so that the long side runs from left to right along the counter. Carefully fold the top half of the dough down to the bottom.
Cutting the dough:
- Line two large baking sheets with parchment paper.
- When the dough is ready to be cut, measure off 3 to 4-inch-wide pieces, and simply cut the dough from bottom to top in straight lines; unfold each strip and cut crosswise in half.
- If making almond croissants, place a rolled piece of almond paste at the top (I would use more than I did!) of each strip of dough and roll the dough into a coil, finishing seam side down. Shape the rest of the croissants and allow them to rise.
Glazing and rising:
- Brush the croissants with egg wash, garnish with almond slices if making almond croissants, and allow them to rise, uncovered, at room temperature for 3 to 4 hours, until tripled in size and spongy. (Reserve egg wash, covered in the refrigerator.) The ideal place for rising is a turned-off oven containing a pan of hot steamy water.
Baking the croissants:
- Preheat the oven to 350º. Brush the croissants once again with egg wash and bake for 12 minutes. Rotate front to back and bake another 4 to 6 minutes until the croissants are deeply golden. Cool on racks before eating.
Storing:
- The croissants are best eaten the day they are made.
- Freeze in an airtight container.
- Thaw the croissants overnight in the refrigerator or at room temperature and reheat in a 350° oven for about 8 minutes.
Notes
Source: Baking with Julia: Savor the Joys of Baking with America's Best Bakers, Esther McManus
Recommended Products
As an Amazon Associate and member of other affiliate programs, I earn from qualifying purchases.

Nutrition Information:
Yield:
10Serving Size:
1 croissantAmount Per Serving: Calories: 285Total Fat: 7gSaturated Fat: 4gTrans Fat: 0gUnsaturated Fat: 2gCholesterol: 35mgSodium: 459mgCarbohydrates: 47gFiber: 2gSugar: 7gProtein: 9g











56 Comments on “Classic Homemade Croissants”
Liz – these are gorgeous. I made all of mine with chocolate in them, but the almond look like a lovely treat.
I didn’t even try to look for the fresh yeast, but working with fresh is on my bucket list…
You are such a bold baker! I have never even tried making my own puff pastry… Your croissants look fabulous. Congratulations!
Liz, I applaud you for all your dedication with these croissants and I am almost afraid to mention that the one item that you can always find in grocery stores around here, is fresh yeast – so I had one bonus with this recipe – I filled some with chocolat and shaped some pains au chocolat but mine look far from the perfection that you always strive for in your baking – they do look better than in the video! Fantastic! Have a great Wednesday!
Your croissants truly look like the kind one buys in Paris. I admire your fortitude and dedication to the process of perfecting the art of baking. Julia Child would be proud =)
Oh Lizzy !!!! Would you mind throwing some of your beautifully-baked croissant ? lol I’m so impressed ! They look just like the ones I’m buying here 😀
I’ve never even had the desire to attempt croissants. SUPER impressed that you did, and that they turned out picture-perfect!
Such beauties! Yeah, the almond croissants rocked! And this is typed by a total chocolate devotee…I was on my toes when rolling the dough – now you got me thinking what muscle group I worked out 🙂
Some day I’m so totally making my own croissants. Nothing compares to fresh!
Wow! Those are some great looking croissants. They look perfect! Great job!! 🙂
They look absolutely amazing! You did a fantastic job!
I am seriously having some croissant envy here. Well done on some perfect looking croissants! It definitely was a full weekend of baking.
These look amazing! way to go!!! 🙂
Beeeeaaauutttiffful! They look amazing, I cannot believe how wonderful they turned out, great job!
They look absolutely perfect! I can totally see myself doing that same thing with the yeast and baking at 4 in the morning. Some people might have slept but their priorities are obviously out of whack. 🙂
Amazing !!!! your croissants look perfect, I love your pictures, and the layers are beautiful!!!
Perfect French baker!!!!
Great job Liz!!!
You are incredible, Liz. Every time I visit your blog, I’m in complete awe of the things you create. I would never dream of making croissants at home – they seem so labour intensive and technical. I’d hate to go through all that time, effort and ingredients to end up with a flop. Your croissant looks perfect, like something I’d get in a French bakery. And I love that you made a version with almond paste and chocolate – yum!
Wow… your layers are impressive indeed! What a bummer that you had to start over but I’m glad that the final results were worth it.
You made croissants? From SCRATCH? You, Liz, are my hero! If you haven’t already, I’d love if you’d come join my How To Tuesday link party, too.
wow, these croissants are gorgeous! Love them! So flaky and perfect. You are a genius!
Adventuresome.. but well worth the effort. Yours look spectacular and very inspiring to make. Thanks for sharing the link to the recipe.